

This cosy is made up of two flat pieces, a left and right side of the cosy, which get joined at the top in the round for 1/4" before the rounds reducing to create the flat top. I recommend using circular needles all the way through and then you can keep flat 'left' on the wire whilst you knit flat 'right' and then easily join together into the round without dropping stitches etc. There will be a short 1" matress stitch join needed at the bottom where the handle is, and a 3" mattress stitch join needed at the bottom on the spout side.
This pattern is mainly suited to a semi-experienced knitter who enjoys improvising. However, it can be simplified for a less expeirenced knitter - but it will look more angluar and less knarled. If the below talk of knots and thicker/thinner lines terrifies you, I have written the base version here, you will only need to know PSSO, ribbing, matress stitch, knitting in the round, K2TOG, and changing colour. You can adorn it with self knitted embelishments or craft shop items to disguise as necessary! I haven't put any photos up of how different it looks compared to the improvised version as I haven't had time yet to make it twice!
All versions of this follow the base pattern as its starter. The basic concept for the bark look of this tree trunk cosy is that the bark is formed by 3x3 rib to give it its lines. Now in terms of making it look tree-bark-y (technical term huh!) you have two options depending how confident you feel:
- Keep it simple, just 3x3 straight ribs. For the basic knitter.
- Play around yourself within the rough rules of 3x3 rib and add in thicker/thinner lines or knots as below.
Ok, so to aid understanding of my instructions; for each set of 3x knits I call this a 'rib', 3s or the dominant stripe, and for each set of 3x knit and 3x purl I call this a 'rib set' or 6s (dominant stripe and its partner recessive stripe). As 95% of the bark is knitted flat, when mentioning knits and purls I refer to right side or wrong side - if for that last quarter inch in the round you are keen to continue thicker/thinner lines or knots then adapt the wrong side row instructions for knitting in the round (swap knits for purls and vice versa).
Thicker/thinner lines

Knots

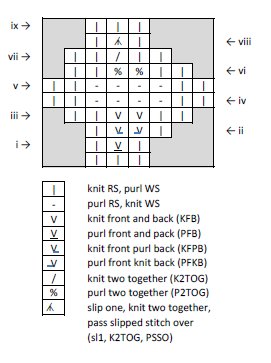 So, for basic small knot, in the 3 'rib' subsitute the following rows for the simple 3, starting on a wrong side row:
row i - P1, PFB, P1
row ii - K1, KFPB PFKB, K1
row iii - P2, KFB KFB, P2
row iv - K2, P4, K2
row v - P2, K4, P2
row vi - K2, P2TOG P2TOG, K2
row vii - P2, K2TOG, P2
row viii - K1, s1 K2TOG PSSO, K1
row ix - return to the simple 3
Or you can do a simple blemish by doing a YO K2TOG in the middles of a bunch of knits.

Remember: bark is nobly bobbly and bulges in places - therefore the tea cosy does not need to fit like cling film maintaining the shape of the pot perfectly all round the circumference. Additional stitches in rows can bulge as you like and bump away from the pot irregularly. If anything, any mistakes you make not maintaining your regimented 3x3 rib will look better!
Once the tree trunk is knitted, you can start to decorate and adorn as you feel best suited to - knit, crochet, felt, button/bead or shop bought. I used my ivy leaf cord pattern, instead of weaving in the ends I used those yarns to sew a little stitch to loosely hold onto the cosy, and some grass. I also placed a curved oak leaf onto the top to disguise the bump of the lid handle.
Why not try for example:
- grass (a 4 stitch icord, decrease to 3 stitch, 2 stitch then cast off to make point on end)
- a variety of crochet flowers, picot flowers, teeny tiny flowers, or knitted tiny flowers
- oak leaves
- a bunny
- an owl
- spider
- ladybirds
- birds
If you follow the improvise pattern then these cosies are like gem stones - each is a unique product, and natural flaws become more special. Would love to see the different scenes you come up with!
No comments:
Post a Comment