A simple, but textured distinct tissue box cover, to jazz up the functional card box without drawing too much attention to it. You could match this with the Ruched Cable Brick Doorstop if you want a co-ordinated ruched-room! I used the same yarn as it worked so well (Wendy Mode a triple helix) but in a different shade as this was for a different room. The join technique at the top with careful three needle bind off inside out means a seamless item with limited weaving in of ends required.

To fit a square tissue box (4 1/2” W x 4 1/2” D x 5” H).
The pattern could be adapted for a rectangular one, but I haven’t got that far yet!
Using 3.5mm circular needle and DK wool (I used a triple helix for interest)
Cast on 148 placing stitch markers every 37 stitches (optional*) and join into round
rounds 1-4 – K2 , P2 rib (ignoring stitch markers)
rounds 5-49 - P4, K12, P4, K12, P4, K1, repeating three more times (stitch markers mark repeats)
except rounds 10, 21, 32 and 43 – P4, 12st-TC, P4, 12st-TC, P4, K1, repeating three more times (stitch markers mark repeats)
Pause at round 49. This should be the sides of your box done (5 inch)

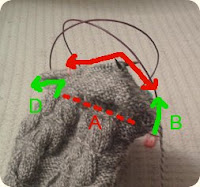
To make the top requires a bit of magic loop style with sort of short rows… or a sort of knitting that I can’t possibly have invented yet can’t find a name for it. You will see your stitch markers* show the 4 sides of the box, lets call them A, B, C and D.
So how do you get this? Insert a second magic loop, so C is on the wire all by itself between two magic loops and A, B, D are as if on normal knitting needles and partway through a row.

This will be your straight rows across the square lid - starting a third of the way across. You are reverse stockinette knitting to and fro across A as in the photo above, but each row (not round) you need to join it to B and D by starting with a K2TOG or SSP; (the first stitch of A and the first stitch of B) and ending with a SSK or P2TOG (the last stitch of A and the first stitch of D). This can be quite fiddly with your stitch markers and needing to shuffle them every first and last stitch - if you are good at counting you can skip them, but if you are instead a spatial person it may take you several rows to notice the square and where to join the sides to the main.

This will be your straight rows across the square lid - starting a third of the way across. You are reverse stockinette knitting to and fro across A as in the photo above, but each row (not round) you need to join it to B and D by starting with a K2TOG or SSP; (the first stitch of A and the first stitch of B) and ending with a SSK or P2TOG (the last stitch of A and the first stitch of D). This can be quite fiddly with your stitch markers and needing to shuffle them every first and last stitch - if you are good at counting you can skip them, but if you are instead a spatial person it may take you several rows to notice the square and where to join the sides to the main.
So first row, moving the stitch marker, transfer the last stitch of B onto the needle next to A, and SSP then purl 35 more stitches, P2TOG (one from A and one from D) having moved the stitch marker.
Next row, turn your knitting (yes, weird when in magic loop even if double magic loop!). Moving the stitch marker again, transfer last stitch of D onto the needle next to A, and K2TOG. Then knit 35 more stitches, and SSK (one from A and one from B) having moved the stitch marker.
And repeat. A will start to look like a square and B and D will get shorter and shorter.

odd rows will be purl
even rows will be knit
row 18 – cast off from stitch 13 to stitch 25 (13 stitches total) and continue 11 stitches knitting as normal, SSK the last stitch and one from B
row 19 – purl first 12 stitches as normal (including the SSP), turn your needles and cast on 13 stitches, turning your needles back to then purl last 11 stitches and P2TOG as normal
row 20 onwards continue as before row 18.
row 38 is your final row. You will need to carefully turn your work inside out (this can be fiddly, don't forget to bring the yarn through with you) and place A on one needle, and C off the magic loop and back onto the other end of the circular needle. (B and D have all been knitted in so don't remain on the needle). Use a third needle to do a three needle purl bind off between A and C.
There we go. Completely seamless and only your starting end to weave in (for the lazy… or your finishing end hidden inside that you can do if pedantic!)
12st-TC (twist cable) means slide 12 stitches onto cable needle, twist clockwise and knit off cable needle loosely.
No comments:
Post a Comment