Showing posts with label cable. Show all posts

Friday, 26 October 2012

Ruched Cable Tissue Box Cover

A simple, but textured distinct tissue box cover, to jazz up the functional card box without drawing too much attention to it.  You could match this with the Ruched Cable Brick Doorstop if you want a co-ordinated ruched-room!  I used the same yarn as it worked so well (Wendy Mode a triple helix) but in a different shade as this was for a different room.  The join technique at the top with careful three needle bind off inside out means a seamless item with limited weaving in of ends required.


To fit a square tissue box (4 1/2” W x 4 1/2” D x 5” H).
The pattern could be adapted for a rectangular one, but I haven’t got that far yet!

Using 3.5mm circular needle and DK wool (I used a triple helix for interest)

Cast on 148 placing stitch markers every 37 stitches (optional*) and join into round

rounds 1-4 – K2, P2 rib (ignoring stitch markers)

rounds 5-49 - P4, K12, P4, K12, P4, K1, repeating three more times (stitch markers mark repeats)
except rounds 10, 21, 32 and 43 – P4, 12st-TC, P4, 12st-TC, P4, K1, repeating three more times (stitch markers mark repeats)

Pause at round 49.  This should be the sides of your box done (5 inch)


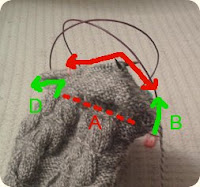
To make the top requires a bit of magic loop style with sort of short rows… or a sort of knitting that I can’t possibly have invented yet can’t find a name for it.  You will see your stitch markers* show the 4 sides of the box, lets call them A, B, C and D.  


So how do you get this?  Insert a second magic loop, so C is on the wire all by itself between two magic loops and A, B, D are as if on normal knitting needles and partway through a row.
  

This will be your straight rows across the square lid - starting a third of the way across.  You are reverse stockinette knitting to and fro across A as in the photo above, but each row (not round) you need to join it to B and D by starting with a K2TOG or SSP; (the first stitch of A and the first stitch of B) and ending with a SSK or P2TOG (the last stitch of A and the first stitch of D).  This can be quite fiddly with your stitch markers and needing to shuffle them every first and last stitch - if you are good at counting you can skip them, but if you are instead a spatial person it may take you several rows to notice the square and where to join the sides to the main.

So first row, moving the stitch marker, transfer the last stitch of B onto the needle next to A, and SSP then purl 35 more stitches, P2TOG (one from A and one from D) having moved the stitch marker.

Next row, turn your knitting (yes, weird when in magic loop even if double magic loop!).  Moving the stitch marker again, transfer last stitch of D onto the needle next to A, and K2TOG.  Then knit 35 more stitches, and SSK (one from A and one from B) having moved the stitch marker.

And repeat.  A will start to look like a square and B and D will get shorter and shorter.


odd rows will be purl 
even rows will be knit

row 18 – cast off from stitch 13 to stitch 25 (13 stitches total) and continue 11 stitches knitting as normal, SSK the last stitch and one from B
row 19 – purl first 12 stitches as normal (including the SSP), turn your needles and cast on 13 stitches, turning your needles back to then purl last 11 stitches and P2TOG as normal

row 20 onwards continue as before row 18.

row 38 is your final row.  You will need to carefully turn your work inside out (this can be fiddly, don't forget to bring the yarn through with you) and place A on one needle, and C off the magic loop and back onto the other end of the circular needle.  (B and D have all been knitted in so don't remain on the needle).  Use a third needle to do a three needle purl bind off between A and C.

There we go.  Completely seamless and only your starting end to weave in (for the lazy… or your finishing end hidden inside that you can do if pedantic!)


12st-TC (twist cable) means slide 12 stitches onto cable needle, twist clockwise and knit off cable needle loosely.

Monday, 4 June 2012

Ruched Cable Brick Doorstop

For an 8" x 4" x 2.5" brick...

Using DK wool (I used Wendy Mode, a triple helix for interesting but simple colour variation) and 4mm needles...

Base
Leaving a long cast-on tail (40cm or so), cast on 42 stitches.
Knit in garter stitch for 24 rows, casting off with a long tail on the last one.

Sides (make 2)
Leaving another long cast-on tail, cast on 15 stitches
row 1 - P2, K4, P3, K4, P2
row 2 - K2, P4, K3, P4, K2
row 3 - P2, 4-st TC, P3, 4-st TC, P2
row 4 - K2, P4, K3, P4, K2
repeat rows 1-4 eight more times and cast off.


Feature
Imagine the following pattern in 7 columns;
  • 5 stitches of reverse stockinette
  • 12 stitches of left purl cable (half stockinette, half reverse stockinette)
  • 5 stitches of reverse stockinette
  • 12 stitches of twisted cable (stockinette)
  • 5 stitches of reverse stockinette
  • 12 stitches of right purl cable (half reverse stockinette, half stockinette)
  • 5 stitches of reverse stockinette

Rows 1 & 2 are your staple right and wrongside rows to repeat unless stated.  The 12-st RPC and 12-st LPC are on an 11 row repeat, and the 12-st TC is on a 14 row repeat.

Cast on 56 stitches
row 1 - P5, K6, P11, K12, P11, K6, P5
row 2 - K5, P6, K11, P12, K11, P6, K5
row 3 - P5, 12-st RPC, P5, 12-st TC, P5, 12-st LPC, P5

row 15 - P5, 12-st RPC, P5, K12, P5, 12-st LPC, P5

row 17 - P5, K6, P11, 12-st TC, P11, K6, P5

row 27 - P5, 12-st RPC, P5, K12, P5, 12-st LPC, P5

row 31 - P5, K6, P11, 12-st TC, P11, K6, P5

row 39 - P5, 12-st RPC, P5, K12, P5, 12-st LPC, P5

row 45 - P5, K6, P11, 12-st TC, P11, K6, P5

row 51 - P5, 12-st RPC, P5, K12, P5, 12-st LPC, P5

row 59 - P5, K6, P11, 12-st TC, P11, K6, P5

row 65 - P5, 12-st RPC, P5, K12, P5, 12-st LPC, P5

row 71 - P5, K6, P11, 12-st TC, P11, K6, P5

Continue until row 75, or until it will comfortably wrap round two long sides and one short side of the brick, and cast off.

Make Up:
First of all, to protect your knitting, wrap an old tea towel or facecloth around the brick, stitching to secure it.  Neatness is not a priority in terms of cotton colour and stitch size as you ultimately won't see it, but the smoother the joins the better.

Using mattress stitch, along the long edge of the Feature piece, stitch the long edge of the Side piece, and then the short edge, and the long edge.  Do this on the other long edge of the Feature piece with the second Side piece.  You will have a 'pocket' of knitting for the brick to sit in.

With the 'pocket' around the brick, mattress stitch the Base to the enclose the brick in.  Weave in ends.  And 'stop' your door!


Key:

12-st LPC: slip 6 st onto cable needle and hold to front, P6, K6 from cable needle
12-st RPC: slip 6 st onto cable needle and hold to back, K6, P6 from cable needle
12-st TC: slip 12 stitches onto cable needle, turn one half turn clockwise, and working loosely knit all stitches from cable needle
4-st TC: slip 4 stitches onto cable needle, turn one half turn clockwise, and working loosely knit all stitches from cable needle


Sunday, 25 December 2011

Bridge Coasters

I have named these the Bridge Coasters as they are for my mother and her bridge club, but one could name them the Whist Coasters, Rummie Coasters, or even Snap Coasters!  A series of cables and slip stitches leave a raised pattern, one for each card suit.

Using good old DK wool and 4mm needles for all coasters...


Diamond Drinks Coaster
Cast on 16...

row 1 - knit
row 2 - KFB, K14, KFB (18 stitches)
row 3 - knit
row 4 - KFB, K16, KFB (20 stitches)
row 5 - knit
row 6 - knit
row 7 - knit
row 8 - knit
row 9 - K8, c2b, c2f, K8
row 10 - K8, byif, sl1p, byib, K2, byif, sl1p, byib, K8
row 11 - K7, c2b, K2, c2f, K7
row 12 - K7, byif, sl1p, byib, K4, byif, sl1p, byib, K7
row 13 - K6, c2b, K4, c2f, K6
row 14 - K6, byif, sl1p, byib, K6, byif, sl1p, byib, K6
row 15 - K5, c2b, K6, c2f, K5
row 16 - K5, byif, sl1p, byib, K8, byif, sl1p, byib, K5
row 17 - knit
row 18 - K5, byif, sl1p, byib, K8, byif, sl1p, byib, K5
row 19 - K5, c2f, K6, c2b, K5
row 20 - K6, byif, sl1p, byib, K6, byif, sl1p, byib, K6
row 21 - K6, c2f, K4, c2b, K6
row 22 - K7, byif, sl1p, byib, K4, byif, sl1p, byib, K7
row 23 - K7, c2f, K2, c2b, K7
row 24 - K8, byif, sl1p, byib, K2, byif, sl1p, byib, K8
row 23 - K8, c2f, c2b, K8
row 24 - K9, byif, sl2p, byib, K9
row 25 - knit
row 26 - knit
row 27 - knit
row 28 - K2TOG, K16, K2TOGtbl (18 stitches)
row 29 - knit
row 30 - K2TOG, K14, K2TOGtbl (16 stitches)
row 31 - knit and cast off


Heart Drinks Coaster
Cast on 16...

row 1 - knit
row 2 - KFB, K14, KFB (18 stitches)
row 3 - knit
row 4 - KFB, K16, KFB (20 stitches)
row 5 - knit
row 6 - knit
row 7 - knit
row 8 - knit
row 9 - knit
row 10 - knit
row 11 - K8, c2b, c2f, K8
row 12 - K8, byif, sl1p, byib, K2, byif, sl1p, byib, K8
row 13 - K7, c2b, K2, c2f, K7
row 14 - K7, byif, sl1p, byib, K4, byif, sl1p, byib, K7
row 15 - K6, c2b, K4, c2f, K6
row 16 - K6, byif, sl1p, byib, K6, byif, sl1p, byib, K6
row 17 - K5, c2b, K6, c2f, K5
row 18 - K5, byif, sl1p, byib, K8, byif, sl1p, byib, K5
row 19 - K4, c2b, K8, c2f, K4
row 20 - K4, byif, sl1p, byib, K10, byif, sl1p, byib, K4
row 21 - K8, c2b, c2f, K8
row 22 - K4, byif, sl1p, byib, K3, byif, sl1p, byib, K2, byif, sl1p, byib, K3, byif, sl1p, byib, K4
row 23 - K4, c2f, K1, c2b, K2, c2f, K1, c2b, K4
row 24 - K5, byif, sl1p, P1, sl1p, byib, K4, byif, sl1p, P1, sl1p, byib, K5
row 25 - knit
row 26 - knit
row 27 - knit
row 28 - K2TOG, K16, K2TOGtbl (18 stitches)
row 29 - knit
row 30 - K2TOG, K14, K2TOGtbl (16 stitches)
row 31 - knit and cast off


Spade Drinks Coaster
Cast on 16...

row 1 - knit
row 2 - KFB, K14, KFB (18 stitches)
row 3 - knit
row 4 - KFB, K16, KFB (20 stitches)
row 5 - knit
row 6 - knit
row 7 - knit
row 8 - knit
row 9 - K8, c2b, c2f, K8
row 10 - K8, byif, sl1p, byib, K2, byif, sl1p, byib, K8
row 11 - K7, c2b, K2, c2f, K7
row 12 - K7, byif, sl1p, byib, K4, byif, sl1p, byib, K7
row 13 - K6, c2b, K4, c2f, K6
row 14 - K6, byif, sl1p, byib, K6, byif, sl1p, byib, K6
row 15 - K5, c2b, K6, c2f, K5
row 16 - K5, byif, sl1p, byib, K8, byif, sl1p, byib, K5
row 17 - K4, c2b, K8, c2f, K4
row 18 - K4, byif, sl1p, byib, K10, byif, sl1p, byib, K4
row 19 - K8, c2b, c2f, K8
row 20 - K4, byif, sl1p, byib, K3, byif, sl1p, P2, sl1p, byib, K3, byif, sl1p, byib, K4
row 21* - K4, c2f, K1, c3b, c3f, K1, c2b, K4
row 22 - K5, byif, sl1p, P1, sl2p, byib, K2, byif, sl2p, P1, sl1p, byib, K5
row 23 - knit
row 24 - K8, byif, sl1p, byib, K2, byif, sl1p, byib, K8
row 25 - K7, c2b, K2, c2f, K7
row 26 - K7, byif, sl1p, byib, K4, byif, sl1p, byib, K7
row 27 - knit
row 28 - K2TOG, K16, K2TOGtbl (18 stitches)
row 29 - knit
row 30 - K2TOG, K14, K2TOGtbl (16 stitches)
row 31 - knit and cast off

* c3b is slip one onto cable needle and hold to back, knit 2, then knit 1 off cable needle.
   c2f is slip two onto cable needle and hold in front, knit 1, then knit 2 off cable needle.


Clubs Drinks Coaster
Cast on 16...

row 1 - knit
row 2 - KFB, K14, KFB (18 stitches)
row 3 - knit
row 4 - KFB, K16, KFB (20 stitches)
row 5 - knit
row 6 - knit
row 7 - knit
row 8 - knit
row 9 - K8, c2b, c2f, K8
row 10 - K8, byif, sl1p, byib, K2, byif, sl1p, byib, K8
row 11 - K7, c2b, K2, c2f, K7
row 12 - K7, byif, sl1p, byib, K4, byif, sl1p, byib, K7
row 13 - K7, c2f, K2, c2b, K7
row 14 - K8, byif, sl1p, byib, K2, byif, sl1p, byib, K8
row 15 - K5, c2b, c2f, K2, c2b, c2f, K5
row 16 - K6, byif, sl1p, byib, K2, byif, sl1p, byib, K4, byif, sl2p, byib, K6
row 17 - K4, c2b, K8, c2f, K4
row 18 - K4, byif, sl1p, byib, K10, byif, sl1p, byib, K4
row 19 - K8, c2b, c2f, K8
row 20 - K4, byif, sl1p, byib, K3, byif, sl1p, P2, sl1p, byib, K3, byif, sl1p, byib, K4
row 21* - K4, c2f, K1, c3b, c3f, K1, c2b, K4
row 22 - K5, byif, sl1p, P1, sl2p, byib, K2, byif, sl2p, P1, sl1p, byib, K5
row 23 - knit
row 24 - K8, byif, sl1p, byib, K2, byif, sl1p, byib, K8
row 25 - K7, c2b, K2, c2f, K7
row 26 - K7, byif, sl1p, byib, K4, byif, sl1p, byib, K7
row 27 - knit
row 28 - K2TOG, K16, K2TOGtbl (18 stitches)
row 29 - knit
row 30 - K2TOG, K14, K2TOGtbl (16 stitches)
row 31 - knit and cast off

Friday, 17 June 2011

Rabbit in the Moonlight Smartphone Case

Called rabbit in the moonlight because the rabbit doesn't stand out as well as I hoped - it's more a mirage of a rabbit (hard to capture on camera). But all the same, I still like the ribbed look. It's based on my Little Owls Smartphone Case using cabling and french knots within a rib repeat.


Using DK wool and 3.5mm needles...

Cast on 32
row 1 - K2, [P4, K4] rep to last two stitches, K2
row 2 - P2, [K4, P4] rep to last two stitches, P2
unless stated, repeat rows 1 on right side & 2 on wrong side

row 5 - K2, P4, c2b, c2f, P4, K4, P4, c2b, c2f, P4, K2
*
row 8 - P2, K4, c2b(p), c2f(p), K4, P4, K4, c2b(p), c2f(p), K4, P2
*
row 11 - K2, P4, c2f, c2b, P4, K4, P4, c2f, c2b, P4, K2
row 12 - P2, K4, sl1, K2, sl1, K4, P4, K4, sl1, K2, sl1, K4, P2
row 13 - K2, P4, K1, P2, K1, P4, K4, P4, K1, P2, K1, P4, K2
row 14 - repeat row 12
*
row 31 - K1, [YO, K2TOG] to end
*
row 38 - cast off following rib pattern

Sew french knots for tail on the 2 rabbits, and then mattress stitch a seam down the side and along bottom using long cast off end.


The idea is to be a snug fit, my phone (Samsung Galaxy Ace) is 11cm x 5cm x 1cm. The ribs are a size to fit a 'chunky' phone (i.e. iPhone 4 square edge rather than 3 curved taper) and nicely edge it, but I'm sure would also fit more slimline models too. Let me know how it looks and fits for other models.


Thursday, 16 June 2011

Little Owls Smartphone Case

OK, so you might guess my favourite colour, and favourite animal from yet another case design....! I got a new phone and quickly needed something to protect it, cue whipping off a quick knitted case with a rib and owl repeat.


Using DK wool and 3.5mm needles...

Cast on 32
row 1 - K2, [P4, K4] rep to last two stitches, K2
row 2 - P2, [K4, P4] rep to last two stitches, P2
unless stated, repeat rows 1 on right side & 2 on wrong side

row 7 - K2, P4, c2b, c2f, P4, K4, P4, c2b, c2f, P4, K2
*
row 10 - P2, K4, c2f(p), c2b(p), K4, P4, K4, c2f(p), c2b(p), K4, P2
*
row 13 - repeat row 7
*
row 21 - repeat rows 7-13
*
row 31 - K1, [YO, K2TOG] to end
*
row 38 - cast off following rib pattern

Sew french knots for eyes on the 4 owls, and then mattress stitch a seam down the side and along bottom using long cast off end.

The idea is to be a snug fit, my phone (Samsung Galaxy Ace) is 11cm x 5cm x 1cm. The ribs are a size to fit a 'chunky' phone (i.e. iPhone 4 square edge rather than 3 curved taper) and nicely edge it, but I'm sure would also fit more slimline models too. Let me know how it looks and fits for other models.

Patterns I love that helped give me some inspiration to put this pattern together include:
>


Thursday, 9 June 2011

Cream Cooler

By using a cosy on your jug it will either keep your cream cool, or your chocolate sauce hot - multi purpose!! The self striping wool I used has a brown top which I think is perfect for 'hiding' those chocolate sauce spills - have a play round with different wools and see what works for you. By slipping the cable stitches on the wrong side it elongates the stitch and makes it stand out in this pretty lattice.


Use an aran wool about 10 ply (I used Rico Designs Poem however you may want to use one that isn't handwash only) and 4.5mm needles. You will also need two short ribbons.

Cast on 48 (makes 6 diamonds of 8 stitches each)
row 1 - [K3, c2b, K3] rep to end
row 2 - [P3, sl2, P3] rep to end
row 3 - [K2, c2b, c2f, K2] rep to end
row 4 - [P2, sl1, P2, sl1, P2] rep to end
row 5 - [K1, c2b, K2, c2f, K1] rep to end
row 6 - [P1, sl1, P4, sl1, P1] rep to end
row 7 - [c2b, K4, c2f] rep to end
row 8 - [sl1, P6, sl1] rep to end
row 9 - K7, [c2f, K6] rep 3 more times, K1
row 10 - sl1, YO, P2TOG, P4, sl1, [sl1, P6, sl1] rep 3 more times, sl1, P4, P2TOG, YO, sl1 (1st button holes)
row 11 - [c2f, K4, c2b] rep to end
row 12 - [P1, sl1, P4, sl1, P1] rep to end
row 13 - [K1, c2f, K2, c2b, K1] rep to end
row 14 - [P2, sl1, P2, sl1, P2] rep to end
row 15 - [K2, c2f, c2b, K2] rep to end
row 16 - [P3, sl2, P3] rep to end
row 17 - K2, sl1, PSSO, c2b, K3, [K3, c2b, K3] rep 3 more times, K3, c2b, K2TOG, K1
row 18 - P2, sl2, P3, [P3, sl2, P3] rep 3 more times, P3, sl2, P2
row 19 - K1, sl1, PSSO, c2f, K2, [K2, c2b, c2f, K2] rep 3 more times, K2, c2b, K2TOG, K1
row 20 - P1, sl1, P1, sl1, P2, [P2, sl1, P2, sl1, P2] rep 3 more times, P2, sl1, P1, sl1, P1
row 21 - K1, sl1, PSSO, c2f, K1, [K1, c2b, K2, c2f, K1] rep 3 more times, K1, c2b, K2TOG, K1
row 22 - P3, sl1, P1, [P1, sl1, P4, sl1, P1] rep 3 more times, P1, sl1, P3
row 24 - K1, YO, K2TOG, c2f, [c2b, K4, c2f] rep 3 more times, c2b, K2TOG, YO, K1 (2nd button holes)
row 25 - casting off as you go... P4, sl1 [sl1, P6, sl1] rep 3 more times, sl1, P4

Use the cast on tail to join the base with four mattress stitches (or however many it takes to get to base of handle). Weave in the end at the top. Thread ribbon through the button holes and tie in a bow to secure on jug.

I got my jug from a local potter at Yandles 303 Gallery, but it should fit most 350ml milk jugs, you may just need to tweak the mattress stitch join, height of button holes to fit the handle (swap two purls for YO, P2TOG at the beginning and end of the row), and you may also need to mattress stitch at the top of the handle.

Monday, 23 May 2011

Little Owl Sunglasses Case

A combination of cable and double moss stitches creates a cute little owl perched in a big tree to protect your chunky bug-eyed sunnies.

Little Owl Sunglasses Case photo

Using 3.5mm needles and DK wool and a bit of ribbon...

Cast on 53
row 1 - P19, K15, P19
row 2 - K19, P15, K19
row 3 - P19, c2fp, K11, c2bp, P19
row 4 - K20, P13, K20
row 5 - P20, c2fp, K9, c2bp, k20
row 6 - K21, P11, K21
row 7 - P21, K11, P21
repeat rows 6 & 7 two times
row 12 - K21, P11, K21
row 13 - P20, c2b(k), K9, c2f(k), P20
row 14 - K20, P13, K20
row 15 - P17, K19, P17
row 16 - K15, P23, K15
row 17 - P9, K35, P9
row 18 - K8, P7, K5, c2bp, P9, c2fp, K5, P7, K8
row 19 - P5, K4, P1, K4, P7, K11, P7, K4, P1, K4, P5
row 20 - K4, P4, K2, P4, K7, P11, K7, P4, K2, P4, K4
row 21 - P3, K2, P5, c2b, c2f, P7, K11, P7, c2b, c2f, P5, K2, P3
row 22 - K3, P1, K6, P4, K7, P11, K7, P4, K6, P1, K3
row 23 - P3, KFB, P6, K4, P7, K11, P7, K4, P6, KFB, P3
row 24 - K3, M1, M1, K6, c2f(p), c2b(p), K7, P11, K7, c2f(p), c2b(p), K6, M1, M1, K3
row 25 - P3, K4, P6, K4, P7, K11, P7, K4, P6, K4, P3
row 26 - K3, SSP, P2TOG, K6, P4, K7, P11, K7, P4, K6, SSP, P2TOG, K3
row 27 - P3, K2TOGtbl, P6, c2b(k), c2f(k), P7, K11, P7, c2b(k), c2f(k), P6, K2TOGtfl, P3
row 28 - K21, P11, K21
row 29 - P21, K11, P21
row 30 - K21, P11, K21
row 31 - P22, K1, P1, K5, P1, K1, P22
row 32 - K14, [P1, K1] thirteen times, K13
row 33 - P13, [K1, P1] fourteen times, P13
row 34 - K9, [P1, K1] eighteen times, K8
row 35 - P10, [K1, P1] seventeen times, P9
row 36 - K8, [P1, K1] nineteen times, K7
row 37 - P7, [K1, P1] twenty times, P6
row 38 - K5, [P1, K1] twenty two times, K5
row 39 - P4, [K1, P1] twenty three times, P3
row 40 - K4 [P1, K1] twenty three times, K3
row 41 - P3 [K1, P1] twenty four times, P2
row 42 - K3 [P1, K1] twenty four times, K2
row 43 - [K1, P1] to end
row 44 - [P1, K1] to end
row 45 - [P1, K1] to end
row 46 - [K1, P1] to end
repeat rows 43-46 twice (double check glasses will fit in, if not keep going here)
row 55 - K1 [YO, K2TOG] to end
row 56 - knit
row 57 - knit and cast off

Chart downloadable in PDF form.

Sew french knots into owl eyes, and duplicate stitch beak. Sew up mattress stitch down the side and along bottom, making sure the Right Side (tree trunk stockinette) is facing out. Thread ribbon through eye-lets and protect your sunnies.

Patterns I love that helped give me some inspiration to put this pattern together include:
I'm on ravelry